Photoshop Secret Shortcuts.
Note: this article is written in Mac Photoshop format. If you are using PC, Cmd = Ctrl and Opt = Alt.- Drag selection
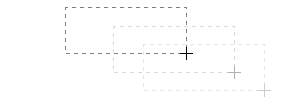
With the Marquee tool, drag on the document (do not release the mouse yet), now hold down Spacebar, it will let you drag the undefined selection.
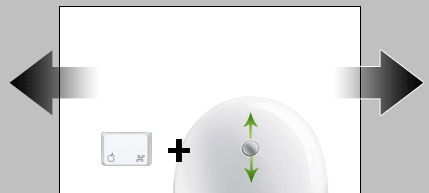
- Navigate the document left or right
Hold down the Cmd key and scroll up or down allows you to navigate the document left or right. For example, hold down Cmd + scroll up will navigate to right.
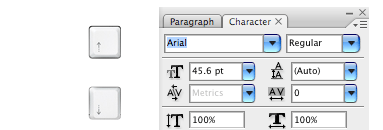
- Browse the font list
Put your cursor in the font list dropdown, you can browse the font list by pressing arrow Up or Down key.
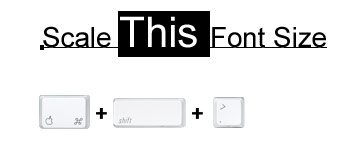
- Scale font size
Select the text that you want to scale the font size, press Cmd + Shift + > or < to increase / decrease font size.
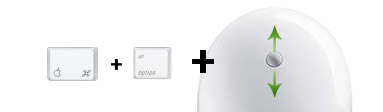
- Zoom with the scroll wheel
You can zoom in / out by Cmd + Opt + scroll up or down.
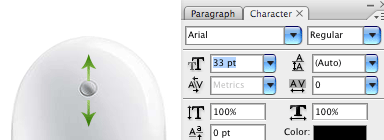
- Drag to adjust numberic value
Mouseover the input box, hold down Cmd + drag left or right to increase / decrease. Hold down Cmd + Opt or Shift key and drag can change the value in decimal or 10 interval. This shortcut works in all dialog palettes.
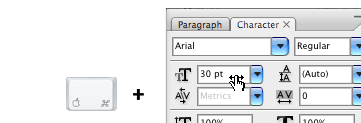
- Scroll to adjust numeric value
Put the cursor in the input box, scroll up or down to increase / decrease value. This shortcut works in all dialog palettes.
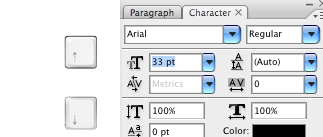
- Arrow up / down to adjust numeric value
Put the cursor in the input box, press arrow Up or Down to increase / decrease. Hold down Shift and press arrow Up or Down will change value in 10 interval.
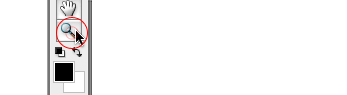
- Zoom to 100%
Double click on the Zoom tool will zoom document to 100%.
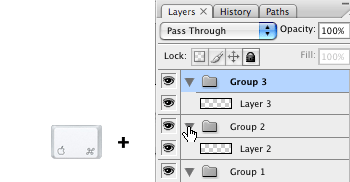
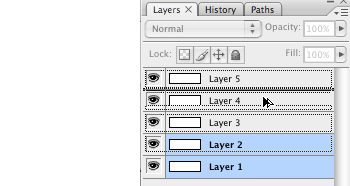
- Collapse or expand all layer groups
You can collapse or expand all root-level layer groups by holding down Cmd + click on the triangle icon. Hold down Cmd + Opt + click on the triangle icon will collapse or expand all level layer groups.
- Show / hide in a row
If you need to show / hide more than one layers, instead of clicking one by one, you can click on the visibility icon and drag in a row.
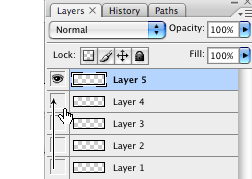
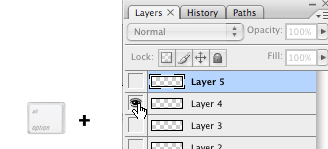
- Hide other layers
Hold down Opt + click on the visibility icon will hide all other layers.
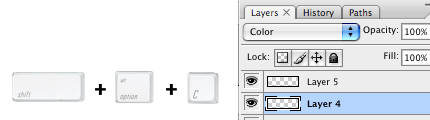
- Navigate layer blending mode
Opt + Shift + "-" or "+" key allows you to navigate through the blending mode dropdown.
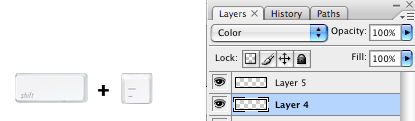
- Set specific blending mode
Opt + Shift + C, N, M, S, D... allows to set layer to specific blending mode.
For examples:
Normal = Opt + Shift + N
Screen = Opt + Shift + S
Multiply = Opt + Shift + M
Color = Opt + Shift + C
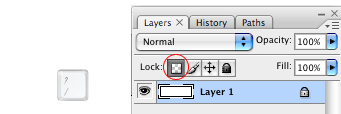
- Lock layer transparency
Press forward slash ("/") to lock layer transparency.
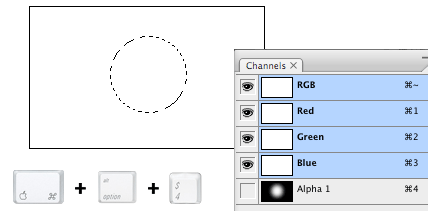
- Load Channel selection
You probably know that Cmd + number keys (1, 2, 3) will activate the channels in sequent. Press Cmd + Opt + number keys will load the selection. For example, press Cmd + Opt + 4 will load Alpha channel 1.
- Tool panels
Press Tab to toggle tool panels.

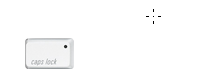
- Precise cursor
Caps lock will display tool cursor in precise mode.
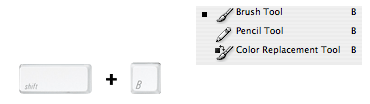
- Navigate the tool list
You can navigate through the tool list by pressing Shift + tool shorcut. For example: B = Brush tool, if you press Shift + B again, you will switch to Pencil tool.
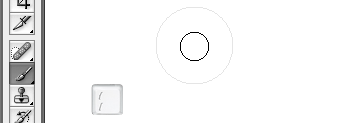
- Increase / decrease brush size
With the Brush tool selected, you can increase / decrease the brush size by pressing [ or ] key (square bracket key). Press Shift + [ or ] will increase / decrease brush hardness.
- Opacity
You can set the layer opacity by pressing the number keys (ie. 1 = 10%, 2 = 20%...). When you have the brush tool selected, pressing the number keys will adjust the brush opacity.

- Duplicate layer
There are several shortcuts to duplicate layers.
1. You can hold down Cmd + Opt + drag to duplicate the active layer.
2. Cmd + Opt + arrow keys (Up, Down, Left, Right).
3. Cmd + J will duplicate the active layer in exact position.
4. Hold down Opt + drag within the Layers palette can also duplicate layers.
- Copy visible and paste in a new layer
Press Cmd + Opt + Shift + E will copy the visible layers and paste in a new layer.

- Change workspace background
By default Photoshop use grey for the workspace background color. You can change that by:
1. select your favorite color
2. choose the Paint Bucket tool
3. Hold down Shift + click on the working area (outside the document area)
Update: right-click on the workspace area to get a dropdown menu - allows you to set the background to black, grey, or a custom color (commented by Todd Patrick).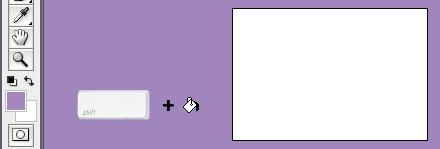
- Fill background or foreground color
Opt + Delete (Backspace) = fill the layer with foreground color.
Cmd + Delete (Backspace) = fill the layer with background color
Update: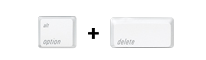
Cmd + Shift + Delete (Backspace) = Fill non-transparent pixels with background color Opt + Shift + Delete (Backspace) = Fill non-transparent pixels with foreground color
(commented by André Dion)
- Switch between document windows
Ctrl + Tab will switch between document windows.

- Load layer transparent
Cmd + click on the layer thumbnail will load its transparency.
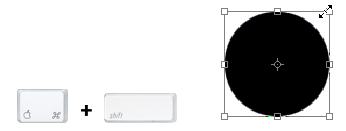
- Scale proportionally from center
When you are using the Marquee tools or Free Transform, hold down Opt + Shift + drag will scale proportionally from the center.
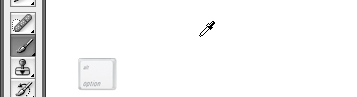
- Shortcut to Eyedropper
If you have the Brush tool selected, hold down Opt key will quickly activate the Eyedropper tool. Hold down Opt + Shift will activate the Color Sampler Tool.
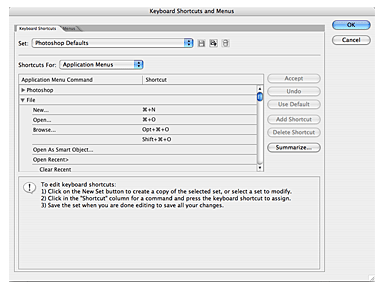
- Finally...
Finally, if you want to check or set your own custom shortcuts, press Cmd + Opt + Shift + K will bring up the Keyboard Shortcuts panel.
How to Create Suspended Text Effect
Final Image Preview

Step 1
First create a new document, 1000×500 pixels, with a black background. Then, create your text in white. The font used is Verdana, and the size is 120pt. Choose Bold from the Font Style selection box next to the Font Family box in the Options bar.
Step 2
Create a new layer on top of the Background layer and call it “Gradient”. Select the Gradient Tool, and set the Foreground color to White. Create a Foreground to Transparent gradient from top to bottom.


Step 3
Pick the Rectangular Marquee Tool, and click the Intersect with Selection icon in the Options bar. Reselect the text (Ctrl + Click on the text layer thumbnail), then draw a rectangle around the first letter.


S – #ff0000
U – #ff7e00
S – #fffc00
P – #a2ff00
E – #06ec00
N – #00d8ff
D – #004eff
E – #7200ff
D – #f000ff
This is what you should get:

Step 4
Set the Fill value for both the “Gradient Letters” and “Colored Letters” layers to 60%, and duplicate each one of them.


Step 5
Now, create a selection from the original text layer again (Ctrl + Click on the original text layer’s thumbnail), use the Rectangular Marquee Tool, and click the Intersect with Selection icon in the Options bar, then draw a rectangle around the first layer.Once the letter is selected, press Ctrl + J to copy it and paste it in a new layer.

Once you’re done, you should have each letter in a separate layer. Remove the eye icon next to the “Colored Letters copy” layer to make it invisible.

Step 6
Set the Foreground color to #e5ffff, and pick the Pen Tool. Make sure to clik the Paths icon in the Options bar as well.


Step 7
Rotate and move the letters to place them on the Rope.


Step 8
We’re going to make the background more colorful. So create a new layer on top of the Background layer and call it “BG Colors”. Then, select a soft round brush, and scatter some different sized spots on your canvas using different bright colors, for example #fe5a00, #ffe100, #7cff00 and #00fff5.


Final Image
............................................................................................................................
Final Image Preview
This Photoshop tutorial shows how to create mental sphere and get realistic reflection from environment to this sphere.

Step 1
Open Mountain Photo on Photoshop. Go to Image > Image Size and change width to 1000px and height to 664px.
Step 2
Open Yoga Photo and copy it to Mountain Photo. Select Yoga Layer and press Ctrl+T to reduce size of photo like shown below.
Step 3
With Yoga layer selected, use the Polygonal Lasso Tool (Feather: 0 px, Anti-alias selected) to select women.


Step 4
Remove selection with Select > Deselect, then correct brightness and contrast with Image > Adjustments > Brightness/Contrast:
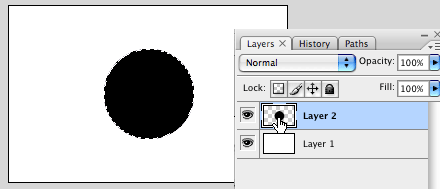
Step 5
Select background layer (Mountain). Make round selection with Elliptical Marquee Tool on it.


Step 6
With selection still active, create new layer above all layers and fill it with black color.

Step 7
Apply Filter > Distort > Spherize.

Step 8
Change layer mode to Screen and lower opacity to 57%.
Step 9
With selection still active, create new layer above all layers and fill it with black color.
Step 10
Deselect area with Ctrl+D an update layer opacity to 0%. After that go to Layer > Layer Style > Inner Glow and apply style with following settings:
Final Image